


When I firs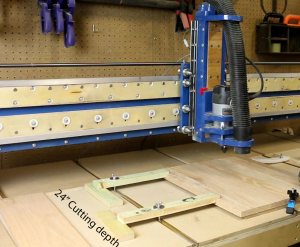 t built my Gatton CNC (based on his Shoestring CNC), I wasn't sure what type of a top I should use or how to affix it. The one thing I did know is that I wanted to use t-tracks for clamping and holding my pieces. I looked online for the best prices I could find on 3 foot long t-tracks and ended up purchasing the Incra brand tracks. Another CNC Youtuber I watch had a video talking about his spoil board. He used MDF and glued it down. I remember him commenting something to the effect of, "when the time comes I simply surface the table and glue another piece of MDF on top." It sounded good to me at the time and so that's what I did too! The first time I surfaced my table top is when I realized the error of my ways... The table that my CNC is built on and the CNC Top are not the same thing. They cannot be the same size! You have to take into account the gantry and the locations the cutter has access to.
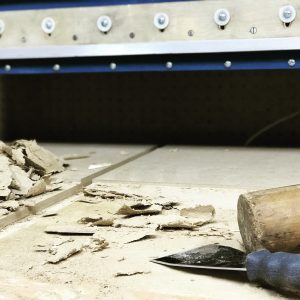
Fast forward a couple of years to where I had surfaced my table for the last time. Now came the ultimate delima, how to get this MDF top that was glued down off without totally damaging the CNC table. First I tried a flat scraper and mallet; hoping to be able to pop all but a thin layer off. Then I resorted to using the CNC with a trusty V-bit to cut channels all the way through to the top of the plywood base. I followed that up with chipping away at the pieces using the mallet and flat scraper. Once I had completed the majority of the table, I was left with that pesky area where the gantry parked and the cutter could not reach. Out came the scrub plane and finally my old #3 Stanley plane.
Once the old MDF top was gone, I was left with a top that was riddled with "war wounds" as I called them. I had to break out some wood filler and try to make the table top reasonably flat and smooth. By this point I already had a plan in my head for what I would be putting in its place. I'm calling it the best spoilboard ever! Yeah, I know... but what can I say, I'm partial to my own design. I started out my design by learning from my mistakes... and I made several. I'm sure by now you have realized the first mistake was gluing down the spoilboard. Which meant that this time I would be mounting the spoilboard using screws and threaded inserts. The second was having a spoilboard that was the same size as my CNC Table. So this time around I found the overall 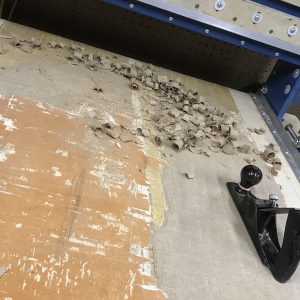 cutting area of my machine and made my spoilboard to fit that area. My third was the number of t-tracks I used across the width of my table. There were simply not enough, which made for some complicated clamping situations and having clamps that were either too short or too long for what I needed. I decided that I would make my MDF pieces 6" wide by 24" deep and then determined the number of t-tracks based on those figures.
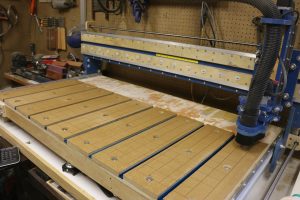
Once the new spoilboard and t-tracks were in place, I broke out my 2 over 2 surfacing bit from Amana tools. This was one of the first bits I purchased from Toolstoday.com. I have to say I absolutely love this bit as it makes surfacing the spoilboard go much faster due to its sheer size. Add to that the cutters are replaceable and able to be rotated 3 times before needing to be replaced. The last step was to layout a 2" x 2" grid carved using a 30 degree v-bit across the entire spoilboard. The grid has to be by far one of my favorite parts to the new spoilboard. There's no guesswork needed to align your project material squarely to the CNC. Since all of these lines were "drawn" by the machine, you are guaranteed your material will be aligned as long as you line up your piece with the grid.
Be sure to check out my project video on this project as well!

Hard to believe this spoil board is still going strong after 2 years of use!