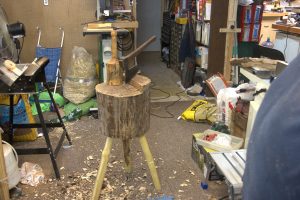
This is a must have item for anyone who uses an axe... period. I wish I would have made one of these years ago. Unless the only reason you are using an axe is to chop down a tree or splitting firewood, then this little wonder is a must have.


This is a must have item for anyone who uses an axe... period. I wish I would have made one of these years ago. Unless the only reason you are using an axe is to chop down a tree or splitting firewood, then this little wonder is a must have.

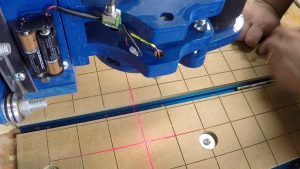
 This project is one I've had on the books for a very long time. I designed my motor mount specifically to hold the laser module 3" away from the center of the router. The most daunting part of this project was creating the custom screen set for Mach 3. In the end, google was my best friend... or as I often refer to it as "Mother Google".
I found and utilized a free application called MachScreen to modify/customize the standard 1024 screen set that comes default with Mach 3. The other thing that mother google provided was help figuring out how to write a script to tell Mach 3 what I wanted it to do upon pressing the button.
Here's that bit of code for any that are interested:
Xmove = -3 'adjust this for X move distance
Ymove = 0 'adjust this for Y move distance
Code "G91 G0 X" &Xmove & "Y" &Ymove ' makes an incremental move the distances that you set
While IsMoving () ' waits while that happens
Wend
Code "G90" 'goes back to absolute moves
DoOEMButton (1008) 'zeros the X and Y DROs
DoOEMButton (1009)
![]()

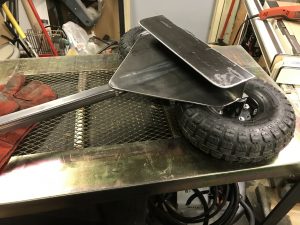
 Working alone most of the time, I often struggle with moving sheet goods into my shop. Perhaps if our driveway were concrete or asphalt, but alas we have a stone driveway. A few years ago I purchased a product called "The Troll" which claims to allow you to easily move up to 300 lbs around a job site. I suppose the job site they were referring to were all comprised of hard surfaces.
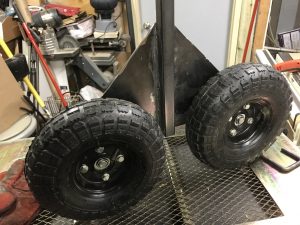
My solution was to build my own version using some steel scrap from a local steel yard and a couple of Harbor Freight tires. While it is not an exact copy of the troll, it obviously bears a strong resemblance. My version not only holds the weight of the other, but has no trouble traversing rough terrain and soft soils. 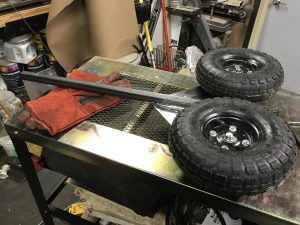

 About a year ago we had 2 American Ash trees that were killed by the Emerald Ash Borer. Shortly after I attended my first green woodworking workshop where we used Ash logs as well. Based on the size of these 2 trees, I wanted to save the wood for use in my woodworking. My deli-ma became how to move these large logs around without hurting myself in the process.
After a bit of research, I found the answer to be that I needed a log arch to move these logs without the need for a tractor with a front end loader and a set of forks. Looking further I quickly discovered that to buy such an item would be more expensive than I thought it was worth. At least to me...
Having completed my first metal fabrication project with scraps I purchased from a local metal supplier's drop bin, I was up for the challenge of building my own. I happened to have a couple old lawn tractor tires, so all I needed was to buy the steel and come up with some sort of plan.
The overall goal was to create something simple. A U-shape piece with some round rod for axles, a long tube that could be hooked to my riding lawn mower and some way to secure the log. I decided that I needed to include a bit of adjust-ability, so I made sure that I found one tube that would slide inside of another tube. Being able to slide one tube inside of the other allows me to expand the length for longer logs.
The last element was to be able to secure the log to the arch using a couple lengths of chain. For that I decided to mount a couple of plates with a series of slots that could hold the links of the chain. Looking back I could have just as easily purchased a few hooks and welded them in place. They may have worked a bit better and looked nicer, but I would still have needed to weld on the plates that I did and they seem to be working out well so far.
Be sure to check out the videos that I posted on my log arch and let me know what you think of this project!

When I firs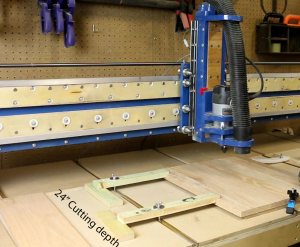 t built my Gatton CNC (based on his Shoestring CNC), I wasn't sure what type of a top I should use or how to affix it. The one thing I did know is that I wanted to use t-tracks for clamping and holding my pieces. I looked online for the best prices I could find on 3 foot long t-tracks and ended up purchasing the Incra brand tracks. Another CNC Youtuber I watch had a video talking about his spoil board. He used MDF and glued it down. I remember him commenting something to the effect of, "when the time comes I simply surface the table and glue another piece of MDF on top." It sounded good to me at the time and so that's what I did too! The first time I surfaced my table top is when I realized the error of my ways... The table that my CNC is built on and the CNC Top are not the same thing. They cannot be the same size! You have to take into account the gantry and the locations the cutter has access to.
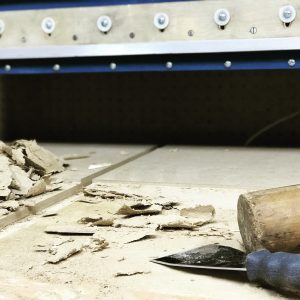
Fast forward a couple of years to where I had surfaced my table for the last time. Now came the ultimate delima, how to get this MDF top that was glued down off without totally damaging the CNC table. First I tried a flat scraper and mallet; hoping to be able to pop all but a thin layer off. Then I resorted to using the CNC with a trusty V-bit to cut channels all the way through to the top of the plywood base. I followed that up with chipping away at the pieces using the mallet and flat scraper. Once I had completed the majority of the table, I was left with that pesky area where the gantry parked and the cutter could not reach. Out came the scrub plane and finally my old #3 Stanley plane.
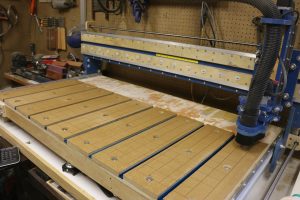
Once the old MDF top was gone, I was left with a top that was riddled with "war wounds" as I called them. I had to break out some wood filler and try to make the table top reasonably flat and smooth. By this point I already had a plan in my head for what I would be putting in its place. I'm calling it the best spoilboard ever! Yeah, I know... but what can I say, I'm partial to my own design. I started out my design by learning from my mistakes... and I made several. I'm sure by now you have realized the first mistake was gluing down the spoilboard. Which meant that this time I would be mounting the spoilboard using screws and threaded inserts. The second was having a spoilboard that was the same size as my CNC Table. So this time around I found the overall 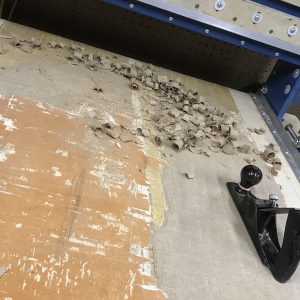 cutting area of my machine and made my spoilboard to fit that area. My third was the number of t-tracks I used across the width of my table. There were simply not enough, which made for some complicated clamping situations and having clamps that were either too short or too long for what I needed. I decided that I would make my MDF pieces 6" wide by 24" deep and then determined the number of t-tracks based on those figures.
Once the new spoilboard and t-tracks were in place, I broke out my 2 over 2 surfacing bit from Amana tools. This was one of the first bits I purchased from Toolstoday.com. I have to say I absolutely love this bit as it makes surfacing the spoilboard go much faster due to its sheer size. Add to that the cutters are replaceable and able to be rotated 3 times before needing to be replaced. The last step was to layout a 2" x 2" grid carved using a 30 degree v-bit across the entire spoilboard. The grid has to be by far one of my favorite parts to the new spoilboard. There's no guesswork needed to align your project material squarely to the CNC. Since all of these lines were "drawn" by the machine, you are guaranteed your material will be aligned as long as you line up your piece with the grid.
Be sure to check out my project video on this project as well!

 This year's annual Indianapolis Woodworking Show will be held on February 2 - 4 at the Indiana State Fairgrounds in Indianapolis. I plan to be there Friday and Saturday this year! Be sure to say hi if you happen to see me there! I'll also have stickers with me to share as well.
After the show on Saturday a group of local makers are sponsoring a meetup at 7 PM at the Free Spirits Sports Bar on 86th Street. I plan on being there as well, so if you don't see me at the show come on out and have a drink afterwards so you can hang with harv!
The Free Spirit Sports Bar
6155 East 86th Street
Indianapolis, IN 47625
(317) 842-0200

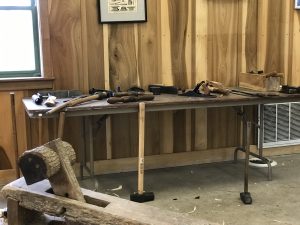
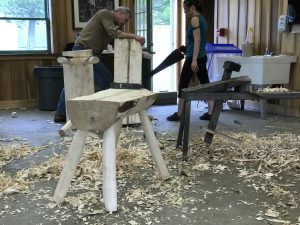
Here in the area we are fortunate to have what is considered a living history museum known as Conner Prairie. Not only is it a neat place to visit, but they also offer classes for both youth and adults. I recently attended one such class offered through their Prairie Pursuits series on Green Woodworking.
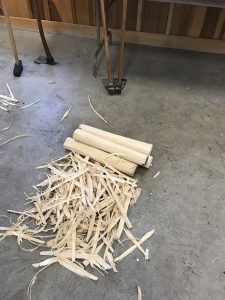
The class started out by selecting a log from the pile of available Ash logs. The logs were between 14" - 16" around and roughly 42" long. After everyone had their log, we were instructed to split our log down the center using large steel splitting wedges and a sledge hammer. Once the 2 halves were separated, I selected the half that I wanted to become the seat and the other half was then split into 4 additional pieces. These pieces would then get taken to the shave horse and turned into rounded legs.
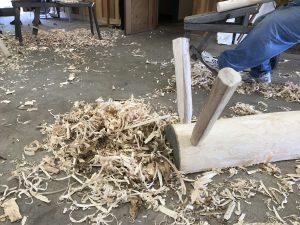
The process of turning the semi square pieces of my log into round legs had to be the most satisfying part of the overall process. There is something about using a drawknife on a piece of green wood locked in a shave horse that I find gratifying. On top of making the legs round, there needed to be a tenon at the end that could then be fit into a 2" hole that would eventually get bored into the underside of the bench.
Once I had the legs ready, but before I created the tenons on the ends... there needed to be 4 holes created using an old T-handled auger bit. Of course, be that could be done I needed to first remove all of the bark from the bench. Sure, it wasn't 100% necessary 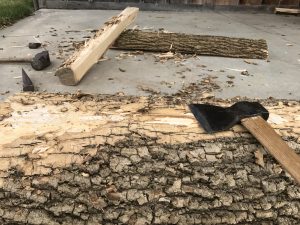 and I'm sure some might prefer the bark on... that's just not the look I was going for, so off came the bark using a hewing axe.
With the bark off and the holes made in the underside of the bench, I set off to create tenons on the ends of each leg. Having marked a 2" circle on the end with a pencil I had no problem getting the tenons created using my trusty drawknife. I made sure to stay outside of my lines so that I could sneak up on the perfect fit. Remember this is green woodworking and the wood will shrink a bit, so a tight joint is desired. Even though a tight joint was the goal, there are a couple factors to keep in mind. First, you
do not want it so tight that it will cause the seat portion to crack or split. Second, we are counting on the round mortise to shrink forming a 'death grip' around the tenon, so it doesn't have to be perfect for it to work.
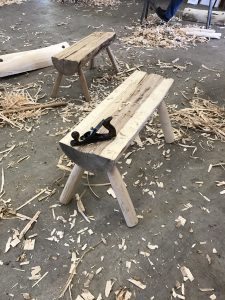
With the tenons fit to each of the holes, the legs were gently tapped into place with a sledge hammer. The bench was then flipped over so we could complete the legs. Using a block of wood and a pencil, a level line was drawn all the way around each of the legs. A traditional western saw was used to then cut the legs along the lines. The result was a bench that sat flat on the floor with good contact all the way around each of the legs.
The final step was to take a scrub plane and flatten the top of the bench only enough to make it pleasant to sit upon. I don't know about you, but I absolutely enjoy taking 'nothing' and turning it into something. This green woodworking class really showed me how enjoyable it can be to work with some of these old hand tools. It just so happens that I have a few ash logs at my house that are begging me to turn them into something! Stay tuned as a shave horse is on my list of projects yet to come on Hangin with Harv.

A friend of the family approached me regarding their need for a special gift for a coach who was retiring. Instead of just purchasing something online, they wanted something from a local craftsperson. I was honored that they chose me for this task. After kicking around some ideas, I set about working within Vcarve Pro on my designs. Generating renderings of the finished product has to be one of the best features of this tool. It makes the job of gaining the customer’s approval a snap.
The base of the plaque was going to be in the shape of a shamrock given the school’s nickname is that of a shamrock. The wording was provided to me by the client. The swimmer and other details were ones I added for some additional flair. I think it came out well in the end… but I must admit, I did take 2 versions of these signs all the way to completion. In the end they both looked good, but I let the customer decide which one they preferred.

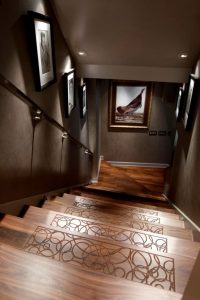 A co-worker was in the process of sharing an upcoming project they wanted to tackle at their new house. They had seen a picture of a staircase on Pinterest that they really liked and were trying to figure out the best way they could replace their carpeted stairs with something similar. After hearing how they were going to try and trace out a full size sketch onto each stair tread and then using a dremel they would simply carve out the design on each tread freehand.
Little did they know, but I had recently completed the building of a CNC machine capable of carving a design on each stair tread exactly the same each time. At my day job we call those repeatable results! Not wanting to step on their DIYer toes by offering to help, I continued to play along and occasionally dropped a hint about this machine I recently built called a CNC that did similar things. After catching the hint that I would be happy to help, we set off to come up with a plan for what we were going to do.
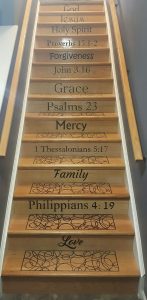
Using Vcarve Pro, I created a project file with several layers with varying styles or patterns for carving. One very nice thing about Vcarve Pro is it's ability to generate a preview of what the machining should look like when completed. I saved several samples and traded ideas back and forth via email. Before I knew it we not only had landed on the design for the stair treads, but we had also kicked up a new idea to carve words into the risers as well.
All in all I think this project resulted in around 3 hours of total design time, 4 hours of machining time and 5 hours of prep and handling. This project was a huge success and probably one of the largest CNC operations I have undertaken so far during this journey to learn all I can about CNC machining.